


SKU Master
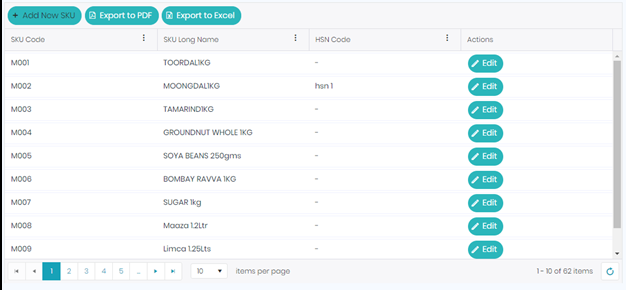
To Create New SKU, go to Masters, select SKU Master.
To create new SKU, click on ‘Add new SKU’ button, it will show the tabs like, SKU Info, Pricing Details, SKU Other Details, Multi Prices, Stores. Fill all the required details and click on ‘Save’ button to save the details.
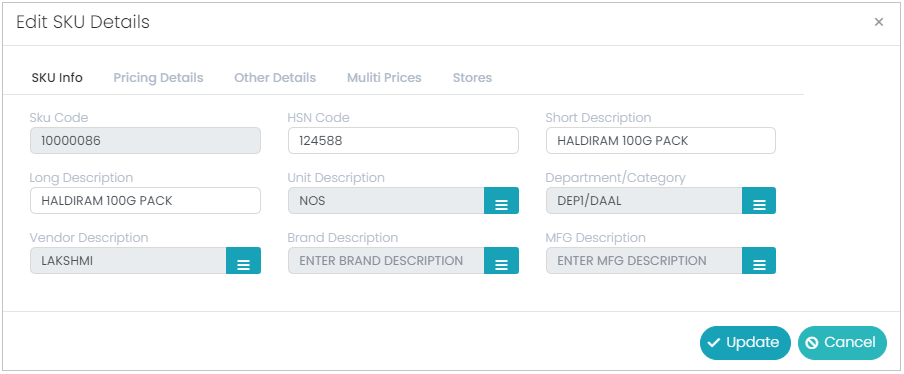
In the SKU Info tab, there will be 9 different fields. SKU Code, HSN Code, Short Description, Long Description, Unit Description, Department/Category, Vendor Description, Brand Description & MFG Description.
*SKU Code: SKU Code is the mandatory field in the SKU Master, there will two options in the SKU Code i.e., Manual entry and Auto generation, these settings will be at 'Configuration settings'.
*HSN Code: HSN Code is the mandatory field in the SKU Master. HSN stands for 'Harmonized System Nomenclature. ' The WCO (World Customs Organization) developed it as a multipurpose international product nomenclature with the vision of facilitating the classification of goods all over the World in a systematic manner, so, enter the same based on the type the product.
*Short Description: Short Description is the mandatory field in the SKU Master, this will reflect in the bill print. So, enter the product’s short description (name of the product).
*Long Description: Long Description is the mandatory field in the SKU Master, this will reflect in the other than the bill print, like search, reports etc., so, enter the product’s long description (name of the product).
Unit Description: Unit Description is not a mandatory field in the SKU Master, but optional. Select the suitable UOM from the list.
*Department/Category: Department/Category is the mandatory field in the SKU Master, select the required Department/Category combination.
Vendor Description: Vendor Description is not a mandatory field in the SKU Master, but optional. Select the required vendor of that product from the list.
Brand Description: Brand Description is not a mandatory field in the SKU Master, but optional. Select the required brand from the list. It is based on location wise.
MFG Description: SKU Code is not a mandatory field in the SKU Master, but optional. Select the required manufacturer from the list.
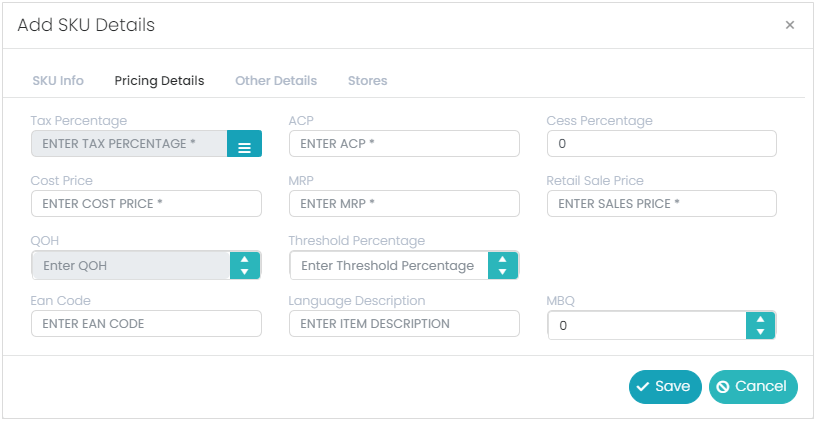
In the Pricing Details tab, there will be 11 different fields. Tax Percentage, ACP, Cess Percentage, Cost Price, MRP, Retail Sales Price, QOH, Threshold Percentage, EAN Code, Language Description & MBQ.
*Tax Percentage: Tax percentage is a mandatory field in the SKU Master. Enter/Select the required tax percentage for that product from the list.
*ACP: ACP is a mandatory field in the SKU Master. ACP (Actual Cost Price), is the cost price of the product before imposing the tax. Enter the required ACP for the product.
Cess Percentage: Cess Percentage is not a mandatory field in the SKU Master, but optional. Enter the Cess percentage here in this field.
Cess is one of the Tax which users can add manually, it will add after the Tax applied to the ACP.
*Cost Price: Cost Price is a mandatory field in the SKU Master. Cost price is the cost price of the product after imposing the tax. This will come automatically based on the selected Tax percentage and ACP, i.e., Cost Price = ACP + Tax Value of ACP.
*MRP: MRP is a mandatory field in the SKU Master. MRP (Maximum Retail Price) is highest/maximum sale price of the product. Enter the required MRP in this field.
*Retail Sales Price: Retail Sale Price is a mandatory field in the SKU Master. This is the selling price of the product. Enter the required selling price in this field.
QOH: QOH is not a mandatory field in the SKU Master, but optional. QOH (Quantity on Hand) is the quantity of the product which is currently there in our location (Outlet/Store/Warehouse). Based on the PO and GRN the stock will be added.
Threshold Percentage: Threshold Percentage is not a mandatory field in the SKU Master, but optional.
EAN Code: EAN Code is not a mandatory field in the SKU Master, but optional. Enter the required EAN from the list.
Language Description: Language Description is not a mandatory field in the SKU Master, but optional. Enter (copy & paste) the SKU name in the local language, which will reflect in the billing application.
MBQ (Minimum Base Quantity): MBQ is not a mandatory field in the SKU Master, but optional. Enter the required MBQ for that product.
MBQ will be define based on Stores it is used for to raise the Indent or for Auto PO.
Formula: MBQ-QOH-On Order quantity. based on this formula Purchase Order will be raised from Ware house to Store.
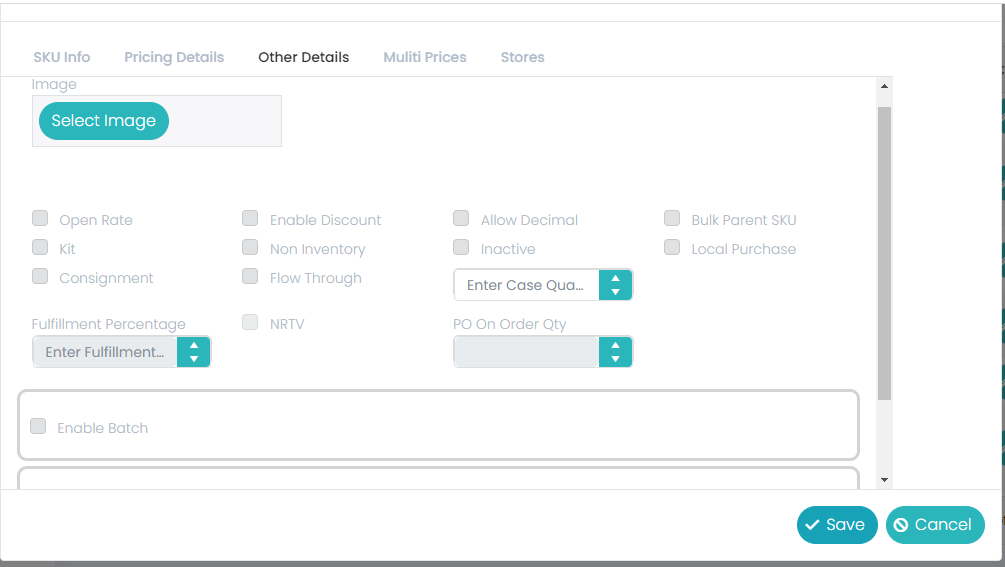
In the Other Details tab, there will be 9 different check boxes for different kind of requirements along with option to upload the images of the products.
Open Rate: Open Rate is not mandatory, in the SKU Master, but optional. If we check this check box, it will allow to change the sale price at billing for a bill, else not.
Enable Discount: Enable Discount is not mandatory, in the SKU Master, but optional. If we check this check box, it will allow to give the discount in the billing, else not.
Allow Decimal: Allow Decimal is not mandatory, in the SKU Master, but optional. If we select this check box, it will allow to enter the decimal quantity for the respective product in the transactions, else not.
Bulk Parent SKU: Bulk Parent is not mandatory, in the SKU Master, but optional. If we check this option, it will show this product in the Bulk Setup as a bulk code, else not.
KIT: KIT is not mandatory, in the SKU Master, but optional. If we check this option, it will be treated as a KIT product, else not. A KIT product cannot have BATCH, it cannot be BOM and it also cannot be PACK product. It will show in the KIT Module.
Non-Inventory: Non-Inventory is not mandatory, in the SKU Master, but optional. If we check this option, it will not allow the billing for the respective product if the stock is zero or less than zero, else not.
Shelf life mean, it’s the number of days of the product which need to be there in the shelf in the store.
Minimum expiry days for receiving is the minimum number of days for receiving while doing the GRN/Receiving app.
Predefined Expiry date will have one option i.e., ‘Minimum Expiry Days for Receiving’. In this the expiry date will be defined to the product at the time of creation only.
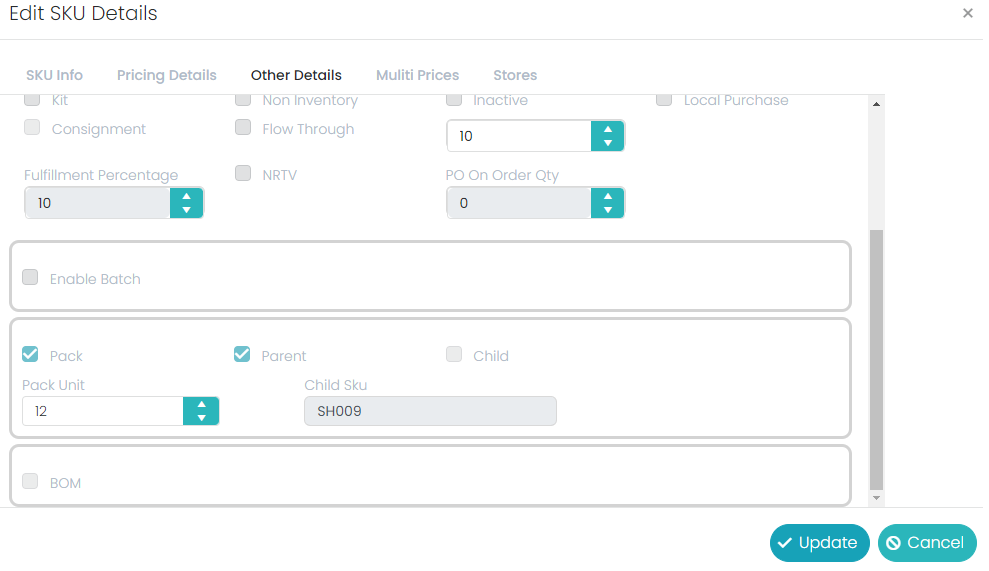
This option is for the FMCG (Fast Moving Consumer Goods) items. If we are creating pack item first, we need to create a child item of the respective parent item.
If we select this option also select the ‘Parent’ check box, then the product will be treated as a parent product, and it will show two more options after selecting the parent check box, i.e., Pack unit and child SKU.
Enter the pack unit (a number) that is how many pieces should be there in the pack of the parent, and then we need to select the respective child item from its respective filed.
All the Transactions will be happened to the Pack but the quantity will update to the child.
Billing will happen for both the Pack and child but the quantity will be deducted from the child as per the Pack Unit.
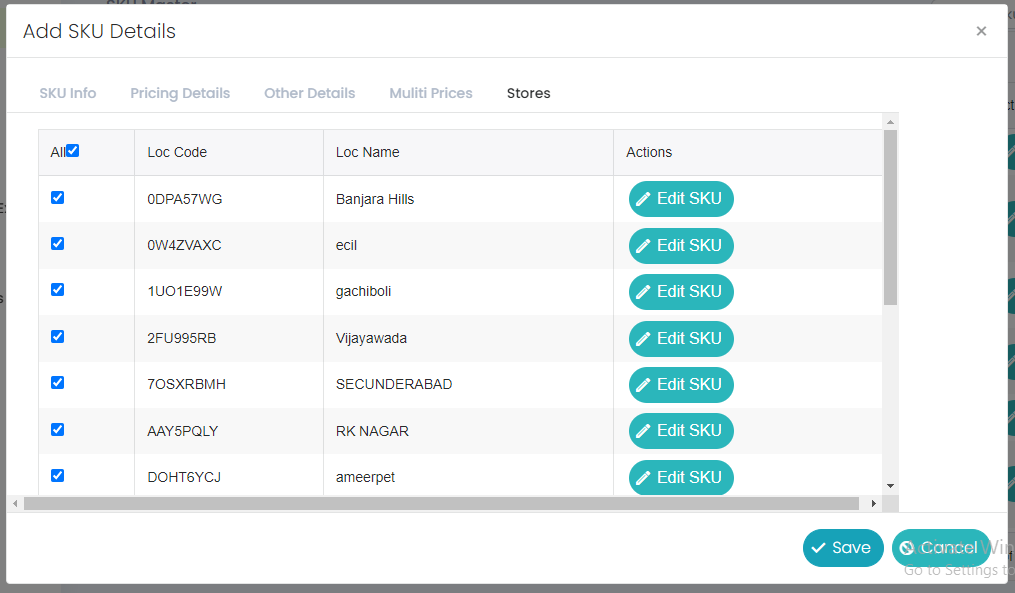
In the Stores tab, we will have all the Stores of the tenant. Here we can link the product to required store or to multiple stores. Click on the ‘SAVE’ button once entered all the details of the product to save the new product.
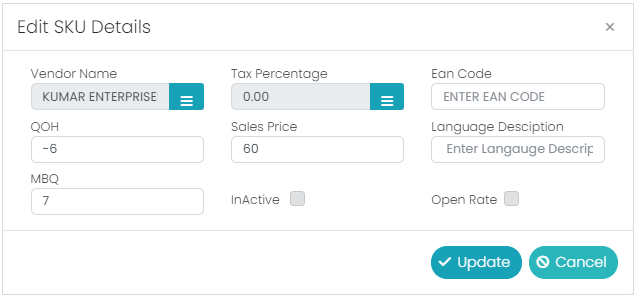
Here while linking a store to the product, we can change below options of the product for the selected store. We can have different Vendor, different Tax percentage, different EAN Code, different QOH, different Sale Price, different Language Description, different MBQ, store wise Inactive & store wise open rate. For this click on the ‘Edit SKU’ button at ‘SKU Master’.
To edit the details of the product, click on the ‘Edit’ button, edit the details and click on the ‘Update’ button.
SKU Info tab
Pricing Details tab
Other Details tab
Other Details tab:
Inactive: Inactive is not a mandatory field in the SKU Master, but optional. If we select this option, it will not allow the respective product in any of the transaction.
Billing will allow for all the inactive SKUs till stock becomes ‘0”.
Local Purchase: Local Purchase is not a mandatory field in the SKU Master, but optional. If the user selects this option, it will be treated as local purchasable product, else not.
Consignment: Consignment is not a mandatory field in the SKU Master, but optional. If we select this option, we must enter the respective percentage of that product in the ‘Consignment Percentage’ filed. Here the consignment product means, a vendor will keep the product(s) for which the GRN was not done and the QOH will always be zero, and Store person will sell those products and out of total sale amount of that product the defined percentage of amount will be given to the vendor.
Flow Through: Flow through is used for the Dairy Products this option is used for Auto PO process. It is not a mandatory field in the SKU Master, but optional.
NRTV (Non –Returnable to vendor): The SKU for which the NRTV (Non-Returnable to Vendor) is enabled, for these Transfer out will not happen from the store to store or store to ware house.
PO On Order Qty: The Quantity of SKU which PO is in Save Mode that will be considered as ON Order Quantity. In transactions Auto FT, Auto NFT, will be consider as the PO quantity as ON Order Quantity.
Enable Batch: Enable Batch is not a mandatory field in the SKU Master, but optional. If we select this option, it will show two more options i.e., ‘Calculate Expiry Date’ and ‘Predefined Expiry Date’.
Calculate Expiry Date will have two more options, i.e., ‘Shelf Life’ and ‘Minimum Expiry Days for Receiving’.
for example: if a product’s minimum expiry days for receiving are 10days, current business date is 2nd Sep 2020, now the product expiry date is 10th Sep 2020, then in this case the GRN/Receiving will happened for this SKU as its minimum expiry days for receiving is 10days, i.e., it will only allow if the expiry date for that product is more than the 12th Sep 2020 i.e., 10+2 (current business date)=12th Sep 2020, so GRN/Receiving will allow this product if its expiry date is 13th Sep 2020 or more.
Example: Milk packets, Bread etc for this the expiry date will be given at the time of packing.
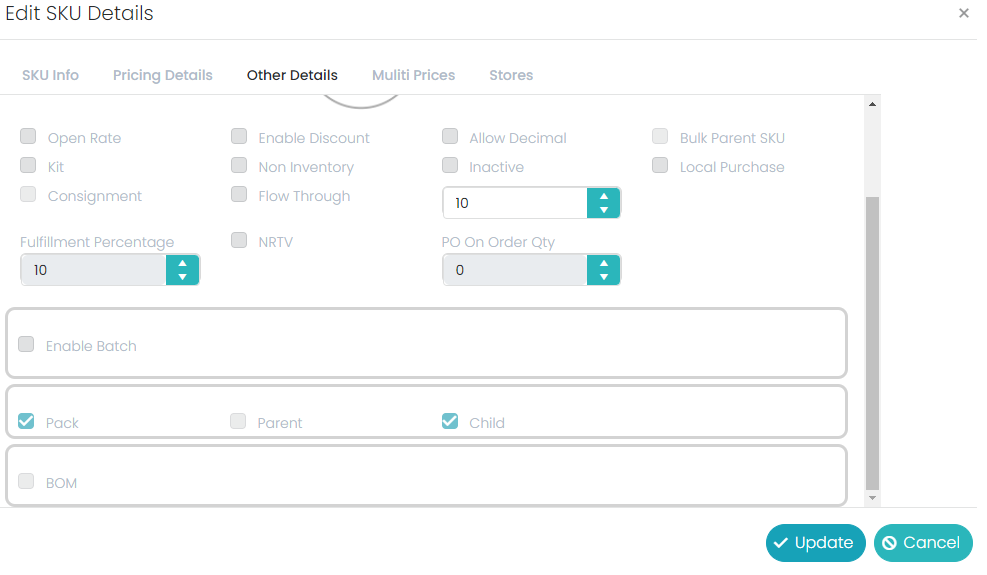
Pack: Pack is not a mandatory option in the SKU Master, but optional. If we select this check box, it will show two more options, i.e., ‘Parent’ and ‘Child’.
Example: Water Bottle in one case we have 12 bottles then the case is called PACK.
So, we can sell the Pack or single bottle.
Store’s tab