


Configuration Settings
-
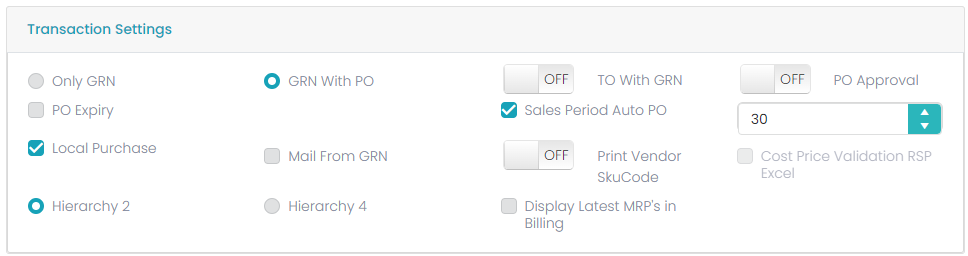
Under ‘Transaction Settings’ we can select below options.
-
Only GRN
-
GRN with PO
-
TO With GRN
-
PO Approval
-
PO Expiry
-
PO Expiry Days
-
Print Vendor SKU Code
-
Sales Period for Auto PO
-
Local Purchase
-
Mail From GRN
-
Hierarchy 2
-
Hierarchy 4
-
Display Latest MRP
-
Cost Price Validation RSP XL
-
✔ Only GRN
If we select this option, it will enable GRN without purchase order. So, without PO we can do GRN.
-
✔ GRN with PO
If we select this option, then it is mandatory to do the purchase order for GRN.
-
✔ TO with GRN
If we select this option, it will enable the option to do the Transfer Out based on a GRN.
-
✔ PO Approval
If we select this option, it will enable PO Expiry, so, at PO the PO Expiry will be considered.
-
✔ Local Purchase
If we check this option, the tenant is allowed for the local purchase else not.
-
✔ PO Expiry Date
This is depending on the PO Expiry option, here we must enter the number of days for the expiry of the PO.
-
✔ Print Vendor SKU Code
If we select this option, it will enable the option of ‘Print Vendor SKU Code’.
-
✔ Sales Period for Auto PO
In this filed we need to enter the number of days for the ‘Sales Period for Auto PO’.
-
✔ AUTO PO Settings
In this there are 3 types which are Supplier wise Auto PO, Hierarchy wise Auto PO and PO line.
-
Supplier wise Auto PO: If user enable this option, then according to that Auto PO will raise as a Vendor Wise.
-
Hierarchy Wise Auto PO: If user enable this option, then according to that Auto PO will raise as a Hierarchy Wise.
-
PO Line: Here if suppose when user enter 100 according to that 10 PO lines will generate in one invoice like that 100 PO lines will generate in 10 invoices. Here by default, it will take 1000 PO lines.
-
✔ Batch Settings
Batch settings will have two types, Manual and Auto Generation.

If we select Manual, we need to enter the batch number manually at GRN or if we select Auto Batch generation then at GRN batch number will be generated automatically.
-
✔ SKU Master Settings
SKU Master settings will have two types, Manual and Auto Generation.

If we select Manual, we need to enter the SKU Code manually at SKU Master or if we select Auto generation then at SKU Master SKU Code will be generated automatically.
-
✔ Indent Type
Indent Type will have four types, Manual Indent, MBQ, Sales & ROL/ROQ.

-
✔ Manual Indent
If we select this option manual indent will be enabled, that is, it will not depend on the MBQ.
-
✔ MBQ Based
If we select this option, then the indent will be made based on the MBQ.
-
✔ Sales Based
If we select this option, then the indent will be made based on the Sales.
-
✔ ROL/ROQ
If we select this option, then the indent will be made based on the ROL/ROQ.
-
✔ Enable Indent from DC
If we select this option, then the indent will be made from the Warehouse to Collection Centre.
-
Bulk Settings
In the ‘Bulk Settings’ there will be two options, ‘Bulk Break up’, ‘Bulk with Wastage and ‘Both’.

If we select ‘Normal’ then usual bulk process will work, that is bulk setup and bulk breakup. If we select ‘With Wastage’ then we can define the wastage percentage which should be considered in the bulk process. If user select both then both the process can do.
-
GSt Based Bill Print
If user ON this GST Based Bill print the bill print generate in two ways one is With Tax bill will generate and second is without tax bill will generate.
If it is OFF, then with tax and without tax SKUs will generate in one bill.

-
Promos Applied On
In the ‘Promo Applied On’ option, there will be two options, ‘On Sale Price’ and ‘On MRP’.

If we select the ‘On Sale Price’ option, then the promos will consider the Sale Price in the promos else if we select the ‘On MRP’ then the promos will consider the MRP in the promos.
-
Weight Barcode Settings

The above mock screen must contain a flag button with ‘Weight length and Check is Digit’,
Check is digit: The user must give a specific number that based on the given number only the last digits of the barcode will remove.
Example: If in Check is digit given a number 1 then from the barcode number 9820000005001, the last digit 1 will remove from the barcode while scanning it will show only 982000000500.
9820000005001, 982000 is the barcode or it can be considered as the SKU.
9820000005001, 000500 is the weight or the Quantity of the product.
Weight length: User need to define the product weight in form of number from 1 to 8.
Example: If the weight length is given as 6, then the weight of each product must be 6 digits only. i.e., 005.010
-
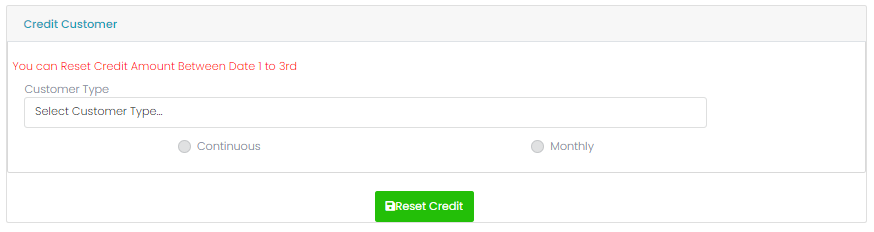
Credit Customer
In the ‘Credit Customer’ option, there will be four types of customer types, ‘LOYALTY’, ‘CREDIT’, ‘PREPAID’, & ‘CORPORATE’. Here for each customer PG.13 type, there will be two options, ‘Continuous’ and ‘Monthly’. If we select ‘Continuous’, then the repayment will be based on ‘Continuous’ and if we select Monthly the repayment will be based on monthly. We can also select all customer types at a time. Reset credit will reset the credit details.
-
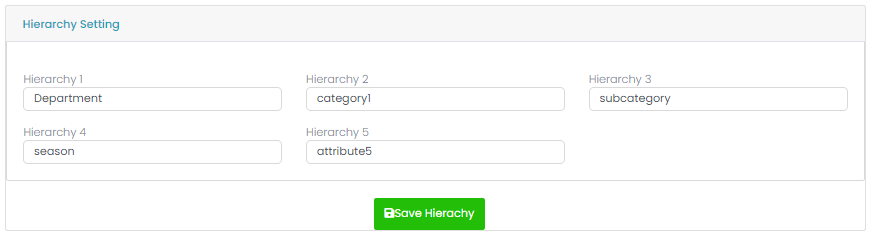
Hierarchy Settings
The Hierarchies are divided in to 5 types. So, while creating the product we can use up to 5 level hierarchies.
-
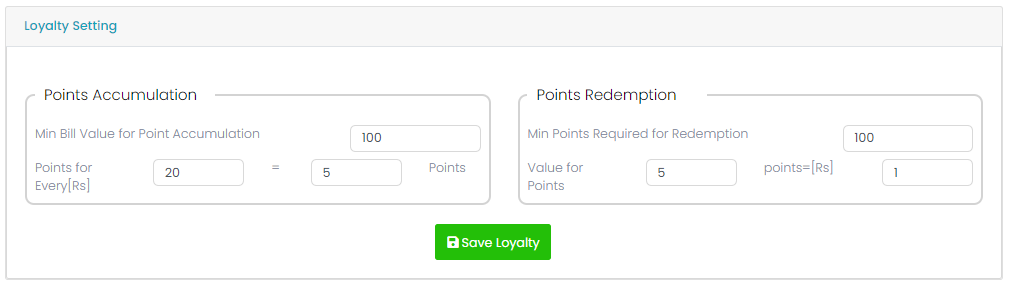
Loyalty Settings
In the Loyalty Settings, we can configure ‘Points Accumulation’ and ‘Points Redemption’.
In the ‘Points accumulation’ it will have ‘Min Bill Value Point Accumulation’ and ‘X’ Points for every ‘Y’ Rupees.
In the ‘Points Redemption’ we can set ‘Min Points required from Redemption’ and ‘X’ value for ‘Y’ points.
-
Round Off
Round off will be used to make the final amount to round off. Here ‘Round To’ will have four values in the dropdown i.e., 1.00, 1.75, 1.50 & 1.25 and ‘Rounding Rule’ will four values i.e., round midpoint up, round midpoint down, always round up and Always Round down.
Select the combination and click on the ’Save Round Off’ button the to save the details.
-
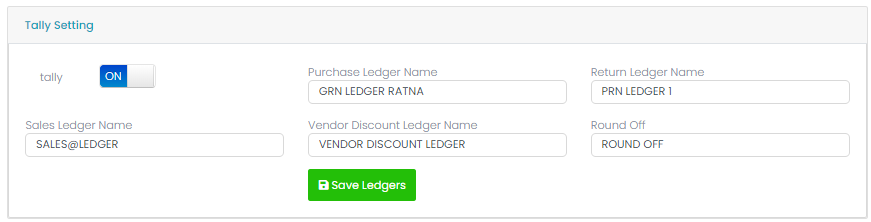
Tally Setting
In the tally setting on/off button will be there. If the button is on, then it will allow to communicate with tally application else not.
Here five options will be there, where we must enter the respective ledger names (the same ledger names should be there in the tally application also) in their respective fields.
Transaction Settings