


Order Settings
In the Prana web application, at Menu, under ‘Setup’ there will be an option with the name ‘Order Settings’. By selecting this it will lead to new screen where it will have two tabs with the name ‘Order App Settings Panel’ and ‘Excel Upload’ as shown in below screenshot.
-
Grocery Segment:
-
Inventory QOH Based
Fixing the inventory for certain % from the current day’s QOH for online orders.
-
Inventory QOH based percentage will fix at the Backend there is no option in front
It will consider the whole current QOH of all the respective products which were allocated for online Order Booking. At regular intervals the current QOH details will be synced to Order Booking app, based on that, the customer will raise the order.
By default, the current location (it could be default delivery location also) will be considered as a delivery location from where the customer doing the order booking and based on the current order booking location the nearby restaurant’s (same tenant) inventory will be considered for the order booking.
-
This option is required only if the ‘Delivery Time Slot’ is ‘ON’, else not.
-
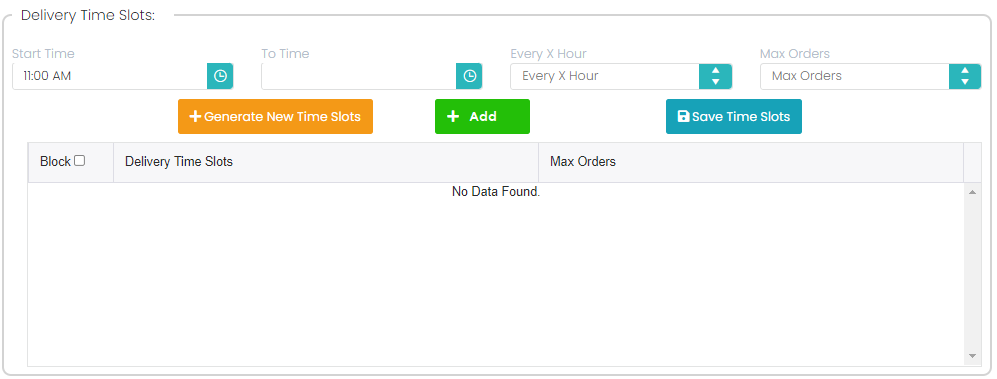
Here we select the details of ‘Slots’ and ‘Maximum Orders per X hours. This screen will have the fields of ‘Start Time’, ‘To Time’, ‘Every X Hours’, ‘Max Orders’, and ‘Generate New Time Slots’, ‘Add’ & ‘Save Time Slots’ buttons will be there.
-
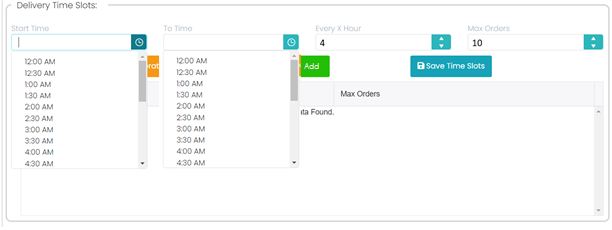
For this fist we need to select ‘+Generate New Time Slots’ button, which will enable time options for the selection, from ‘Start Time’ and ‘To Time’, select the time slots from them, next at ‘Every X Hour’ field enter per how many hours we can accept maximum orders for the delivery for that slot, and click on the ‘Add’ button to add this record in to the below grid.
-
In this way add all preferred slot records and finally click on the ‘Save Time Slots’ button to save the slot details.
-
Start Time:
It is a mandatory field, it should not allow to enter any value in this field manually, but it should allow to select the showing slots only. This should not be greater than or equals to the ‘To Time’.
-
To Time:
It is a mandatory field, it should not allow to enter any value in this field manually, but it should allow to select the showing slots only. This should not be less than or equals to the ‘Start Time’.
-
Event X hour:
This is the time in between the selected slot, and per this time the maximum orders can be accepted for the delivery. This is a mandatory field, and it should accept only numeric value.
-
Max Orders:
It is a mandatory field. This field is to enter the maximum number of orders per selected duration of a particular slot. It should allow numeric value only.
-
Block:
It is used to block the slot, so that it will not be visible at Order app for the customers. It is an optional thing but not mandatory.
-
EXCEL Upload Option:
In this option there is a Download Template first need to download the template in that 3 columns will available which are Pack, SKU code, UOM after entering then save it and in excel option there is a chooses file click on that upload the file and click on upload the data it then data will upload.
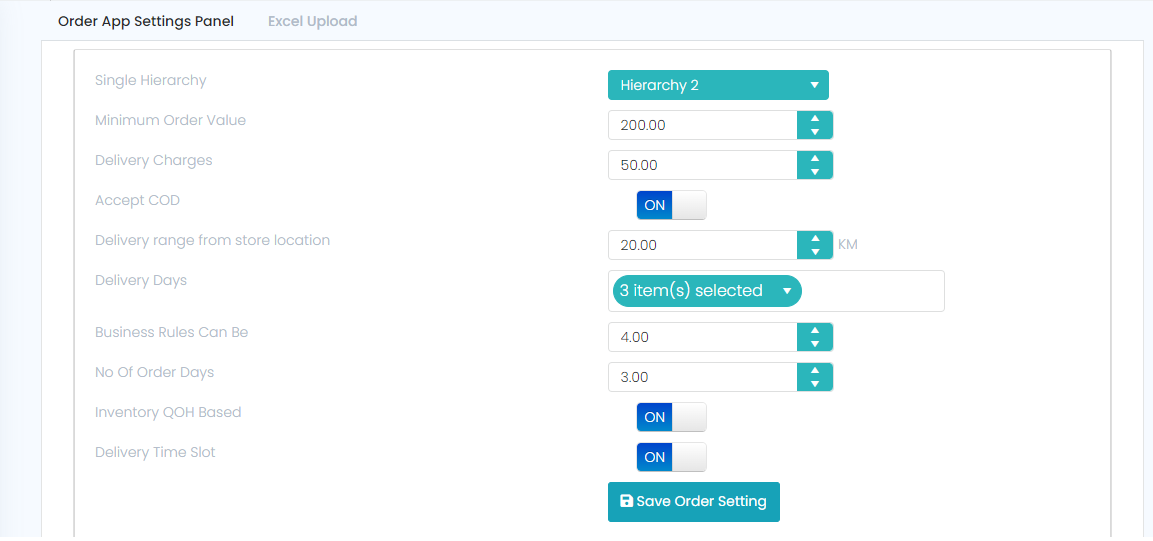
Single Hierarchy:
It is a dropdown field, which will have Hierarchy1 and 2. Based on the selected hierarchy the items will be displayed in the order app, it is a mandatory filed.
Minimum Order Value:
Here we are defining the Minimum order value for each order to deliver to the Customer online, and it is a mandatory filed. It should accept only numeric value.
Example: If the bill value is less than Rs. 200/-, then delivery charges need to be applied, else not.
Delivery Charges:
If the customer can’t reach the minimum order value, then delivery charges need to be applied on the Bill value, and it is a mandatory filed. It should accept numeric value only.
Accept COD:
When this button is in ON, then in online order it will accept the Cash on delivery for the order, when the button is OFF then COD orders won’t accept for the delivery, and it is not a mandatory filed. filed. It should accept numeric value only.
Delivery Range from Store Location:
This is to define the maximum distance for the delivery of the order from the store. It is a mandatory field. It should allow only numeric value; max length is 2 digits only.
Delivery Days:
This option is to select the days of a week for accepting the orders, i.e., in drop-down it will show all the weekdays (from Monday to Sunday) list and from them the user needs to select on which day(s) they will accept the orders. It is a mandatory field.
Invenntory QOH Based:
If this option is ‘ON’ then the inventory for the orders will be considered based on the given QOH percentage, i.e., for example if we have given the QOH percentage as 40% here, then 40% of the current day’s QOH of the selected store will be allotted for the order booking for that store else it will consider 100% QOH of that store for the orders. It is not a mandatory field.
If we set it to ‘ON’ then only QOH% field will be shown else this ‘QOH %’ field will not be shown.
For this inventory we can have two ways below.
1. Grocery Segment
2. F&B Segment
By default, the ‘Default Address’ will be considered as a delivery address and based on the delivery address the respective store’s inventory will be considered as a stock for the online order booking.
# Case 1: if user enable ‘inventory QOH based’ then while doing check out in ordering app it will check QOH based on below logic.
For Example: if we fix it to 40%, Store’s current QOH is 200, then for online orders it will consider only 80 out of 200 i.e., because 40% of 200 is 80, and rest of the QOH, i.e., 120 will be available for walk-in customers.
# Case 2: if user disable ‘inventory QOH based’ then while doing check out in ordering app it will not check QOH based on above logic.
NOTE:
FNB Segment
Delivery Time Slot:
Here if this option is set to ‘ON’, then in the total ordering process, it will show the slot details and orders will work on slot basis, else not. It is not a mandatory field.
Save Order Settings (button):
This is a save button to save whatever settings we have given at this settings module. While saving the details it should validate all the mandatory fields, type the data inserted and then it should save the details.
Delivery Time Slots:
Please find below screens for the reference.
Screen (initial screen)
Screen (adding slots and entering the details)
Screen (after adding the slot records into the grid)
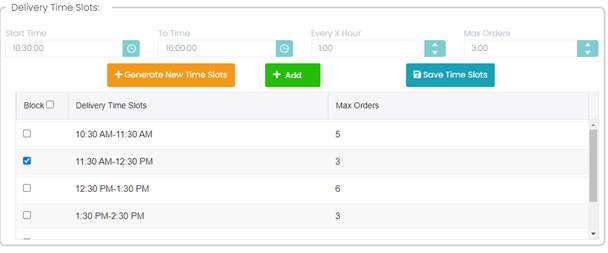
Note: when we generate the new slot, timing based on the X hours and Max orders the slots will be created.